Introducing another split keyboard: the Chicklet
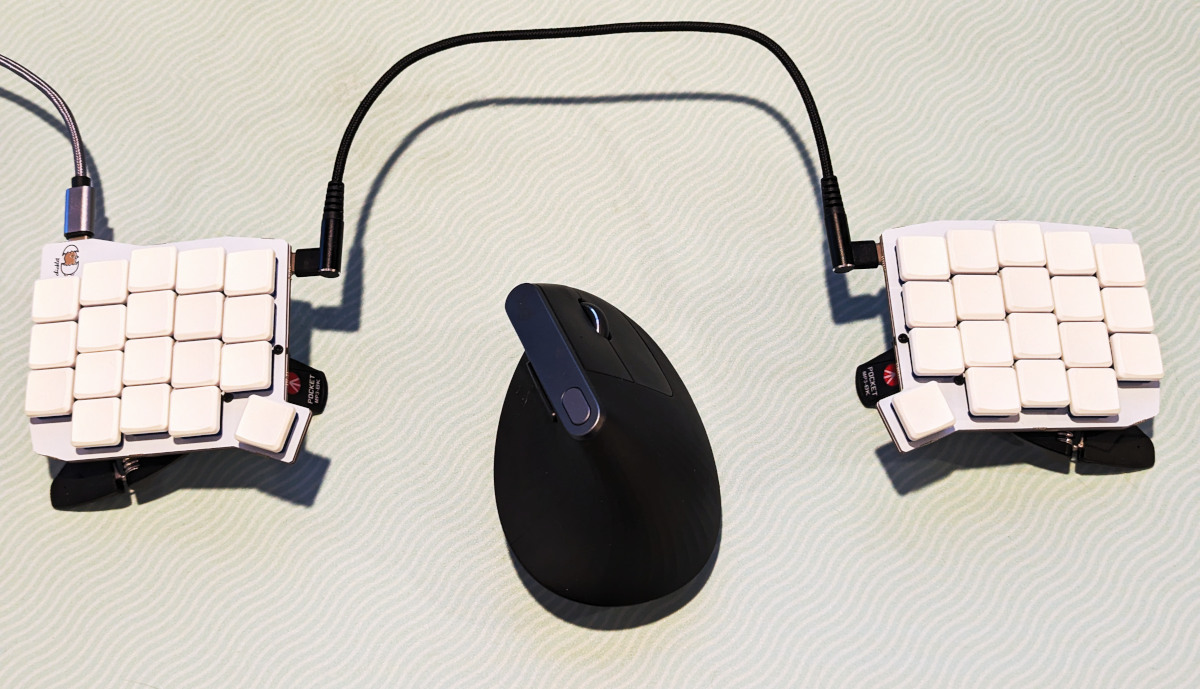
It’s time for another keyboard post! My latest creation is a 38-key split and today we’ll be talking about its design and development.
Layout
Key counts for split keyboards are essentially bimodal - there many around 60%, and again many with just 34 keys. A 60%ish split presents ease of use, as it can quickly be adapted to from a standard keyboard. The 34-key split meanwhile begins to manifest the ideal of 1DFH, or one distance from home — meaning that each key is no further than one position from home position, minimizing the amount of finger travel while typing. Each hand of a 34-key split will typically have a 3x5 body and two thumb keys.
The 38-key form factor is a bit less popular and doesn’t seem to be well represented in the hobby. It has just a few more keys than 34, but I have found that those extra keys provide quite a bit of utility. It strays only slightly from 1DFH, but allows more keycodes to be accessible with fewer layers.
Consider the following groups of keycodes which you find represented on a 100% keyboard:
- Alpha
A-Z - Numerals
1-0 - Symbols
-=[];',./`\ - Space, tab, enter, and backspace
- Shifted numeral symbols
!@#$%^&*() - Modifiers (
shift, ctrl, caps, alt, super) - Navigation (
up, left, right, down, pgup, pgdn, home, end, del, esc) - Functions
F1-F12
We can consider the shifted numerals here as already being on a de-facto layer, even on a 100% keyboard, as you must hold shift to access them. On a 60%, the last two groups are moved to layers: function keys are accessed through Fn, and navigation keys are often on the Fn layer as well. On a 40%, the numerals themselves are removed from the default layer too. Often, you now see the “navigation” and “numeral-symbol” groups being split into two separate layers. On most 30% boards, you now throw away dedicated keys for modifiers, and instead use a tap-hold capability to have them share keys with alphas. Often, layers will also be accessed via tap-hold on keys shared with codes like space or enter.
Once you get down to 30%, you find yourself having several raised layers. For example, the keymap I use for 34-key boards has three: numbers and symbols, navigation, and functions. There are many ways to access layers, but the most common is momentary (held) layer keys located in the thumb cluster. This is great if you have multiple thumb keys, however I prefer to use only one per hand.
With just one key per hand, we become somewhat limited in how many layers we can have. On my 34-key keymap, the left thumb key activates the num-sym layer, the right activates nav, and both simultaneously activates functions. However, it would be nice to remove the need to press both at the same time to access that layer – and I did not want to add another layer-tap key.
This is the problem solved by going up to 38 keys: numbers, symbols that don’t fit on the main layer, and function keycodes can all fit together.
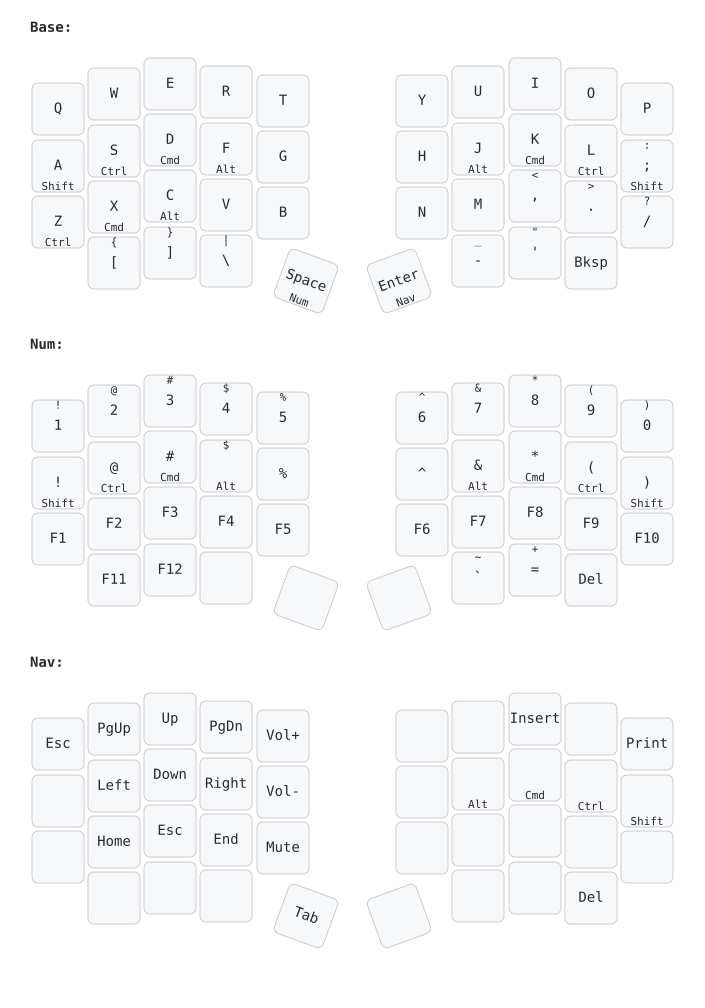
Another idiosyncrasy of this layout is that the three keys below the main block are inline with body columns rather than being part of the thumb cluster. This is another personal preference of mine — I deviate from 1DFH slightly here, but find that the mobility of those three fingers allows easier access to these keys than my thumb would.
Hardware
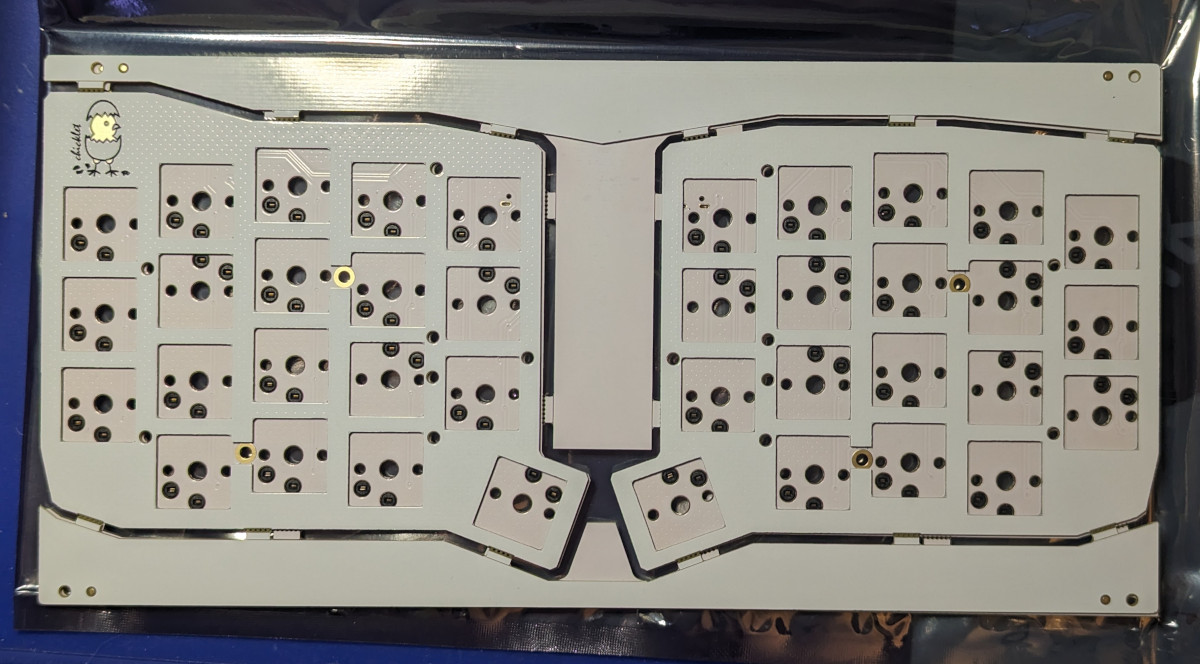
Another goal for this board was to make building it relatively inexpensive. I used a Seeed XIAO microcontroller and two PCA9555 I2C I/O expanders. Strictly speaking, the primary (left) side of the keyboard did not need the I/O chip but could have been matrixed directly on the XIAO – however, I wanted to have access to the interrupt signal from the peripheral PCA9555 so I could build a wireless version of this board which does not need to constantly scan. The XIAO did not have the I/O to spare, so I added another chip on that side, too.
The addition of two PCA9555s at around $1 each still makes this cheaper than a dual-XIAO split board. It also makes a wired split link possible while retaining the possibility of using BLE to connect to a computer - which is much more battery friendly than a dual-MCU split can be given the current limitations of ZMK.
Since this was meant to be a more budget oriented board, I omitted RGB this time around. However, I retained hotswap sockets to make assembly quick and easy. I also added features to allow attaching a tenting puck, so it can be attached to a mini tripod for customizable positioning.
One final hardware feature worth mentioning here is a set of pads designed to enable a modular peripheral system. I would like to be able to add extra features like OLEDs and trackpads, but wanted to do so in a way that would not require soldering. I placed four pads, exposing power and I2C, and intend the modules to use pogo pins to connect to these.
I had all the SMT components, except the XIAO, assembled overseas, and the PCBs and switchplates arrived in their panels.
Firmware
For now, I have only done the work for QMK but intend to set up ZMK in the future. While trying to get the firmware working, I noticed one small error in the design. Fortunately, it ended up not being a blocker. The PCA9555 expects logic-low on its inputs, however I set up the diodes for logic-high. This only meant I had to swap the roles of pins, i.e. between rows and columns, in firmware.
The firmware is available in the eggsworks QMK fork.
Build
The full build is described on my documentation site. In summary, the XIAO needs to be soldered to the board, one only needs to attach the switchplate then install switches and keycaps before plugging it in and flashing firmware.

The board is open source.